


How to Control the Color of an SVG in Webflow
Author:
Adrian Raath
UI/UX Design
Posted on:
Mar 20, 2023
Mar 20, 2023
Category:
Webflow
Webflow
One thing Webflow does not allow you to do by default is directly control the color of SVG’s through the designer. Thankfully though, this can be fixed with a simple little bit of custom code.

We all know Webflow is powerful. It allows you to design and develop impressive interfaces and mind-blowing interactions in minutes, that’s exactly why I love it. One thing Webflow does not allow you to do however is directly control the color of SVG’s through the designer. Thankfully though, this can be fixed with a simple little bit of custom code. Don’t be scared, it’s easy.
1 - Get your SVG
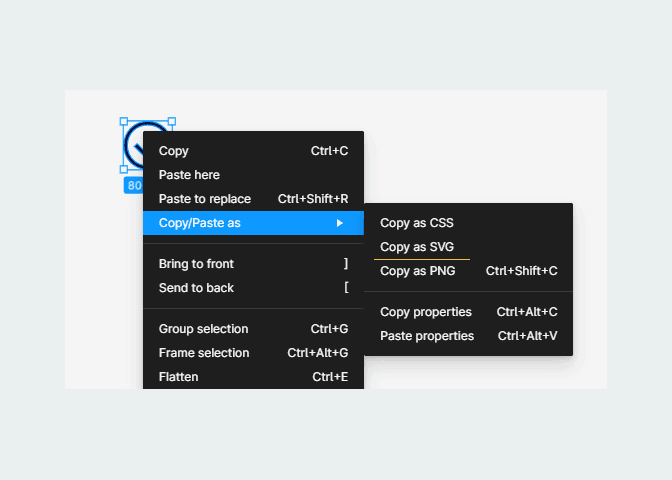
The first step is to get whatever SVG you are going to be using. Now normally, this would mean exporting your icon/graphic as an SVG and uploading it to the Webflow asset panel. To control the color of your SVG in the designer, you need to do get the SVG code and place it in an embed within Webflow. Let’s start with getting the SVG code (a lot less scary than it sounds I promise).
Follow these steps (Figma based):
Upload/drag your SVG into your Figma document
Right click on your icon and click “Copy as SVG”
Quick note: The steps above will be the same in any major design tool
2 - Place an Embed in Webflow
Back in Webflow, place an embed where you would like your SVG to appear.
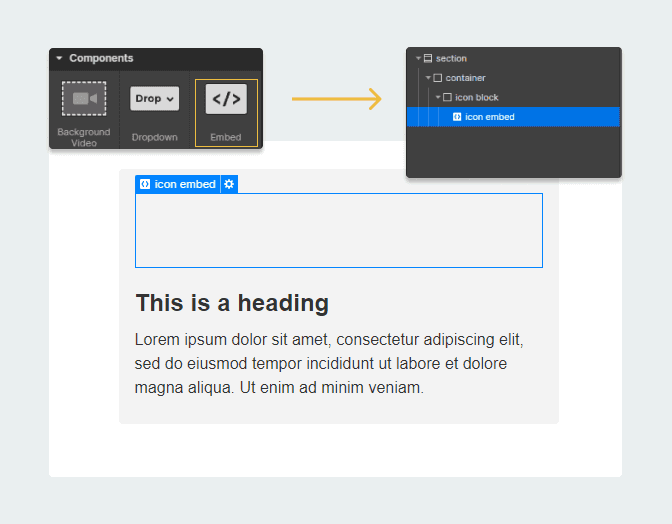
3 - Paste your SVG code in the embed
Now paste the SVG code you copied in step one into your Webflow embed. You can get to the contents of the embed by clicking the little cog wheel on the top right of the embed element in your designer. To make sure the code wraps (which makes it easier to read), ensure line wrapping on the bottom left of the code editor is checked.
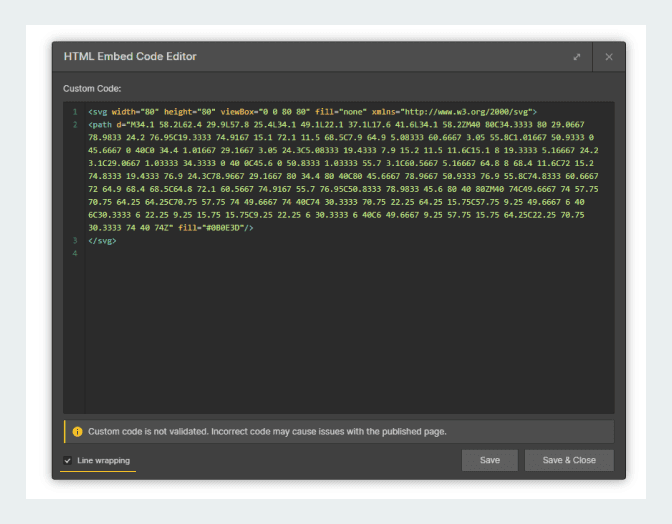
4 - Change the “fill” to “currentColor”
Change the “fill” parameter in your embed code to “currentColor”. This will allow the font color set on your Webflow embed element to control the color of the SVG itself. Remember to use camelCase otherwise this won’t work!
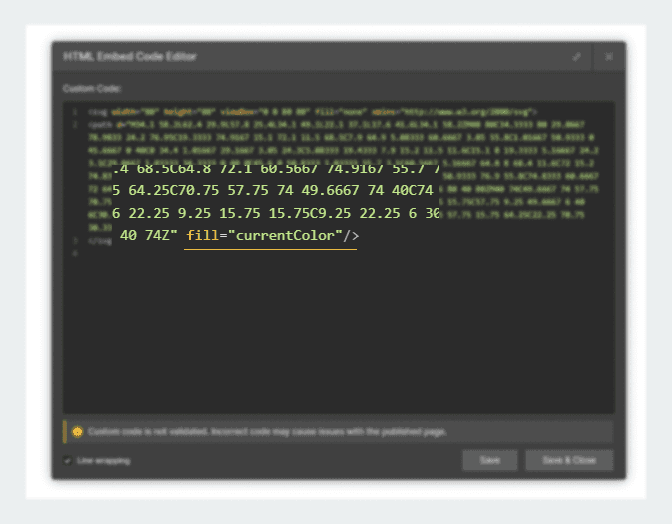
Keep in mind that the example used here is for a simple SVG. For more complex SVG’s with multiple layers and colors, there will be multiple fill parameters. For this reason, this technique is best used with simple, one color SVG’s.
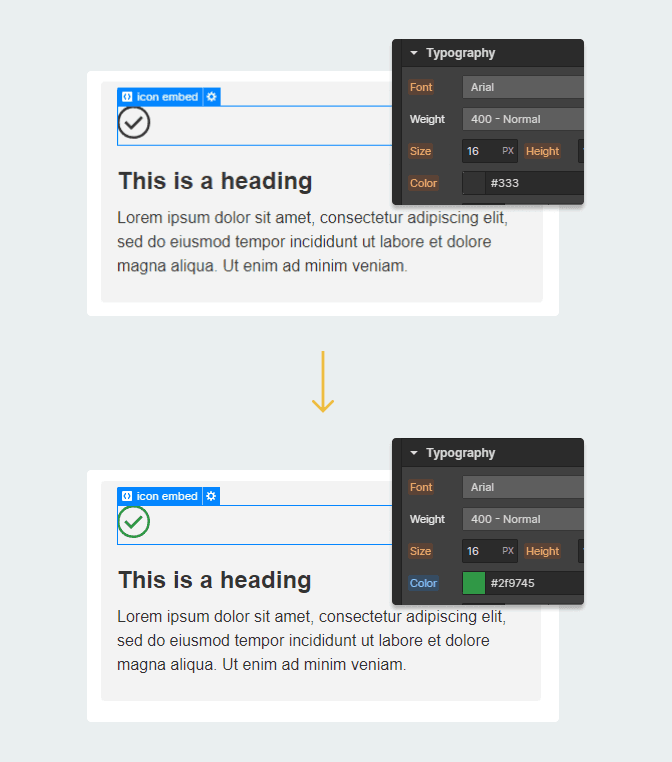
5 - Change the color setting of your embed
If you completed the steps above correctly, the color setting of your embed element class will now be controlling the color of your icon! This will work in exactly the same way as it would for a text element giving you nice flexibility to manipulate the SVG’s color with interactions.
Wrapping Up
And that’s all there is to it! This is a really nice way to go when using SVG icons as it allows you to manipulate the color of your SVG’s through Webflow interactions. A nice, easy workaround to a small Webflow limitation.
We all know Webflow is powerful. It allows you to design and develop impressive interfaces and mind-blowing interactions in minutes, that’s exactly why I love it. One thing Webflow does not allow you to do however is directly control the color of SVG’s through the designer. Thankfully though, this can be fixed with a simple little bit of custom code. Don’t be scared, it’s easy.
1 - Get your SVG
The first step is to get whatever SVG you are going to be using. Now normally, this would mean exporting your icon/graphic as an SVG and uploading it to the Webflow asset panel. To control the color of your SVG in the designer, you need to do get the SVG code and place it in an embed within Webflow. Let’s start with getting the SVG code (a lot less scary than it sounds I promise).
Follow these steps (Figma based):
Upload/drag your SVG into your Figma document
Right click on your icon and click “Copy as SVG”
Quick note: The steps above will be the same in any major design tool
2 - Place an Embed in Webflow
Back in Webflow, place an embed where you would like your SVG to appear.
3 - Paste your SVG code in the embed
Now paste the SVG code you copied in step one into your Webflow embed. You can get to the contents of the embed by clicking the little cog wheel on the top right of the embed element in your designer. To make sure the code wraps (which makes it easier to read), ensure line wrapping on the bottom left of the code editor is checked.
4 - Change the “fill” to “currentColor”
Change the “fill” parameter in your embed code to “currentColor”. This will allow the font color set on your Webflow embed element to control the color of the SVG itself. Remember to use camelCase otherwise this won’t work!
Keep in mind that the example used here is for a simple SVG. For more complex SVG’s with multiple layers and colors, there will be multiple fill parameters. For this reason, this technique is best used with simple, one color SVG’s.
5 - Change the color setting of your embed
If you completed the steps above correctly, the color setting of your embed element class will now be controlling the color of your icon! This will work in exactly the same way as it would for a text element giving you nice flexibility to manipulate the SVG’s color with interactions.
Wrapping Up
And that’s all there is to it! This is a really nice way to go when using SVG icons as it allows you to manipulate the color of your SVG’s through Webflow interactions. A nice, easy workaround to a small Webflow limitation.