


A Simple Webflow On-Page SEO Checklist
Author:
Adrian Raath
UI/UX Design
Posted on:
Mar 20, 2023
Mar 20, 2023
Category:
Webflow
Webflow
A simple, 5 step SEO checklist that should help you understand the basics of on-page SEO and how to apply them on your Webflow website without being an SEO expert.

If you are not familiar with basic SEO best practices, a quick Google search on “how to optimize my site for SEO” can do a great job of sending you into a world of over complicated answers that leave you even more confused than you were before. I know this because I have done just that. Luckily for you, the lessons I have learned have helped me form a solid understanding of what Google wants from you in exchange for solid SEO rankings. I have applied these basic on-page SEO tactics to achieve solid organic search growth on multiple content sites built in Webflow. Hopefully they help you do the same!
Quick Note on SEO and Webflow
Almost all SEO gurus on the web will point you towards WordPress. They do this because of plugins like RankMath and Yoast which hold your hand through the on-page SEO optimization process. Don’t get me wrong, those plugins are great and all but once you understand the basics of on-page SEO, they really are not necessary and in my opinion, the benefits Webflow offers are a great way to future proof your website for sustainable SEO success.
What do I mean by future proof?
Recent updates in Google algorithms show a clear shift towards the value of holistic website user experience. Google wants its users to have their questions answered by the websites it puts forward in search results, and it wants these answers to be provided in a way that is enjoyable, quick and efficient. Recently added ranking factors such as “Page Experience”, “Core Web Vitals” and “Mobile Usability” are clear evidence of this shift. The flexibility, code quality and site speed offered by Webflow websites put them in a great position to enjoy sustainable SEO growth for years to come, provided they adhere to a few basic principles.
The Webflow On-Page Checklist
This checklist focuses purely on on-page factors, those being the actual content on your web page and a few pieces of meta data like your page title and meta description.
Set Your Title and Meta Description
Your title and meta description are extremely important pieces of information that Google will use, and place great priority on when indexing your website. They give Google’s bots, a first look into what your page is about and what search terms they should index and rank you for. Without setting these to be relevant to your target keyword, you are going to have a very hard time ranking. Once you have decided on your primary target keyword for your page, you can set your title and meta description by following the steps below.
On Static Pages
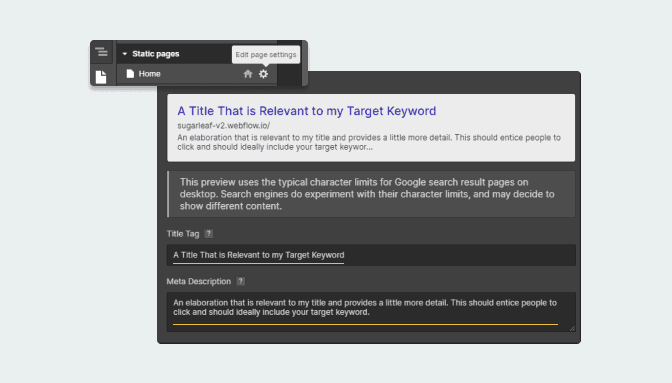
To change your title and meta tag on static pages, simply navigate to the relevant page in your page list, open settings and scroll down to “SEO Settings”. Once there, change the content accordingly as per the graphic above. Webflow does an awesome job of providing a preview as to how this will affect your page preview in Google search results which is a really nice touch.
On CMS Pages
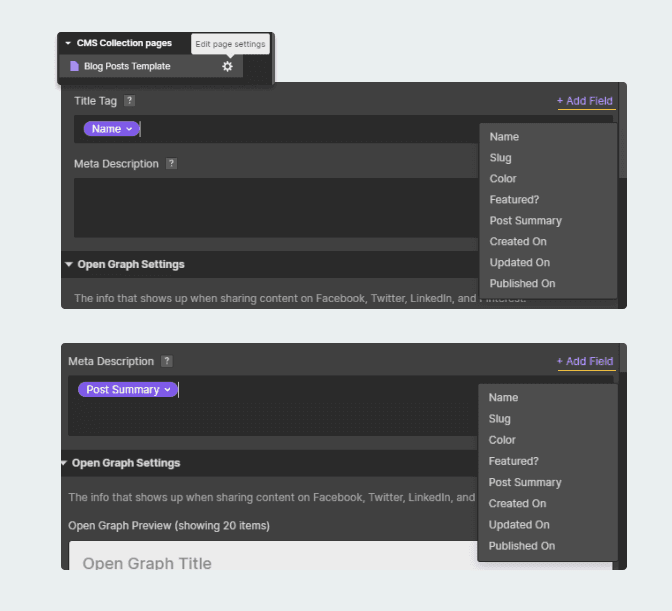
Webflow makes it easy to set title and meta tags on CMS pages dynamically. Simply navigate to your relevant CMS template, open up settings and scroll down to “SEO Settings” as you would on a static page. Then to pull data from your CMS collection items dynamically, click on the “add field” links on the top right for “title” and “meta description” respectively and assign them to the value of your choice. Setting the title to the name of the item is generally the best way to go provided it is relevant to the keyword you are targeting (which it should be). In this case I have assigned the meta-tag to the post summary. The best thing to do here would be creating a dedicated “meta-tag” parameter for this collection item and assigning it to the meta tag setting in your template settings.
Keep Your Page Heading(H1) Consistent With Your Title
The Title you setup in step 1 above exists to tell Google and your visitors who find you through Google search what your page is about. If there is discrepancy between your title tag and the heading of your page, both visitors and Google will deem your page to be less relevant than if they were closely related. Because of this, you want to make sure that your page heading aligns with your title tag. This will help Google determine the relevance of your page more effectively and encourage users to engage after entering your site.
Bad Example

The above title tag and page heading combination is poor from an SEO perspective. The title that would appear in Google search results makes mention of specific details, these being Webflow and E-Commerce. The visible heading(H1) on the page is broad and generic creating a disconnect between what both Google and visitors see in search results and the actual content on the page.
Good Example

The above example has solid contextual and keyword consistency between title and on-page content. The new and improved heading makes mention of both Webflow and E-Commerce, making the page appear more relevant to Google for searches containing these terms. This makes it far more likely that this page will be indexed for its intended keywords.
“Chunk” Content Using Headings
Breaking your content up into bite-size, semantically related “chunks” makes your content scannable and provides structure. Each of these chunks should be introduced by a relevant heading (in most cases with the use of an H2 tag). Introducing each of these chunks with an accurate, descriptive heading helps Google’s bots better understand your content. This gives Google a clearer idea as to the keywords it should index and rank your page for. These headings are also very useful to visitors scanning your page as it helps them get to relevant content quickly and with less effort. This increases the amount of time they spend on your site and that, being another Google ranking factor, helps boost your SEO rankings even further.
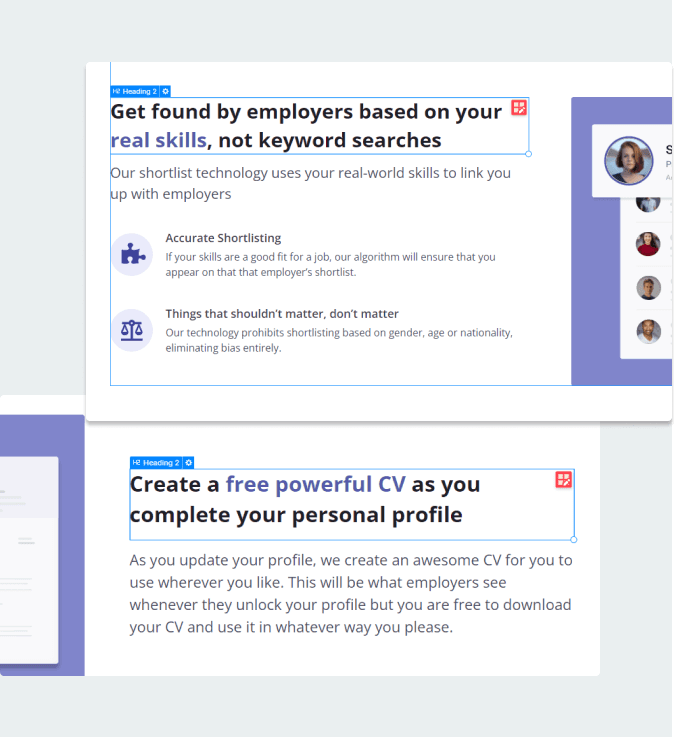
The example above shows two “chunks” of information, each of them introduced by headings that contain keywords relevant to both Google and website visitors.
Optimize Your Images for Sitespeed
Site speed has always mattered when it comes to user experience. With the introduction of Core Web Vitals as a ranking factor by Google, it now matters for SEO rankings as well. One of the major culprits for slow websites are oversized, uncompressed image files.
If you download an image from a stock photography site, and it is 1920x1080 pixels in resolution, putting that same image into a container that never gets wider than 600 pixels is inefficient from a site speed perspective. Resizing the image to be 600 pixels wide would cut the file size in 3 (more or less) without any compromise on display quality. Now if you repeated this process on every image for a blog post with 6 images let’s say, you would see a massive improvement in site speed.
When it comes to image resizing, always ask yourself the question: “What is the biggest this image would ever need to be given its position and styling on the website?”. Once you have your answer, resize it using a free tool like Adobe Express before uploading to Webflow to keep the file as small as possible while maintaining image quality.
After resizing, you can cut the file size down even further by compressing it. Using a free tool like TinyPNG can further reduce the file size of your images significantly, resulting in even faster load times.
Update the Alt Text of Your Images
Google can crawl and understand text. It cannot understand the visual meaning of images and this is what makes alt text so important for SEO. Setting alt text on your website images explains to Google their relation to your text content and as a result, contributes to how your page is ranked and indexed. Setting alt text is also important for accessibility as it tells people using screen readers, unable to actually see website images what your images are about.
Setting alt text on static images
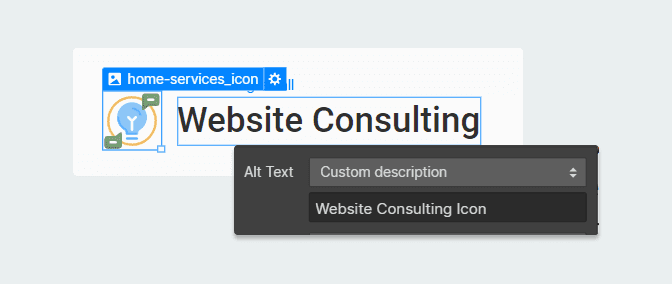
To set alt text on static images within Webflow, click on the settings cogwheel for the relevant image, click the alt text dropdown and select the “custom description” option. Set the custom alt text to something contextually relevant and you are good to go!
Setting alt text on CMS images (In blog/rich text content)
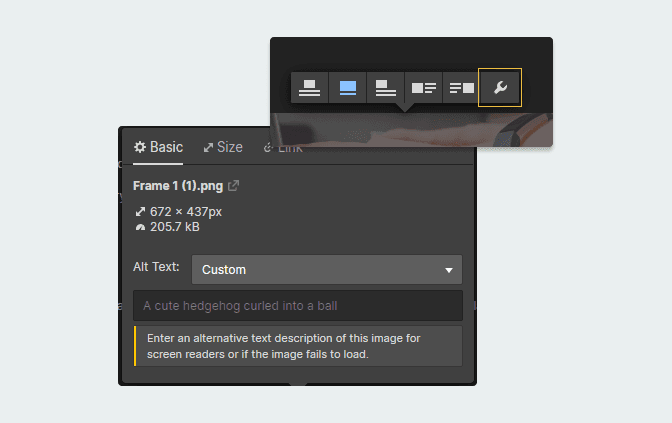
You can set alt text for images within rich text elements, directly on a given CMS item’s settings. Simply click on the image for which you want to update alt text, click on the spanner highlighted above and create your alt text in the box provided. Once you save your changes on the CMS item your alt text will be applied.
Wrapping Up
While this is not an exhaustive list of absolutely everything you could do to optimize your Webflow on-page SEO, it should help give you a solid understanding of on-page SEO basics and how to apply them on your website. At the end of the day, what Google wants is for you to create high quality content that answers searchers’ questions. Creating good content and applying the steps in this checklist will help you get the SEO ranking rewards you deserve without being an SEO expert.
If you are not familiar with basic SEO best practices, a quick Google search on “how to optimize my site for SEO” can do a great job of sending you into a world of over complicated answers that leave you even more confused than you were before. I know this because I have done just that. Luckily for you, the lessons I have learned have helped me form a solid understanding of what Google wants from you in exchange for solid SEO rankings. I have applied these basic on-page SEO tactics to achieve solid organic search growth on multiple content sites built in Webflow. Hopefully they help you do the same!
Quick Note on SEO and Webflow
Almost all SEO gurus on the web will point you towards WordPress. They do this because of plugins like RankMath and Yoast which hold your hand through the on-page SEO optimization process. Don’t get me wrong, those plugins are great and all but once you understand the basics of on-page SEO, they really are not necessary and in my opinion, the benefits Webflow offers are a great way to future proof your website for sustainable SEO success.
What do I mean by future proof?
Recent updates in Google algorithms show a clear shift towards the value of holistic website user experience. Google wants its users to have their questions answered by the websites it puts forward in search results, and it wants these answers to be provided in a way that is enjoyable, quick and efficient. Recently added ranking factors such as “Page Experience”, “Core Web Vitals” and “Mobile Usability” are clear evidence of this shift. The flexibility, code quality and site speed offered by Webflow websites put them in a great position to enjoy sustainable SEO growth for years to come, provided they adhere to a few basic principles.
The Webflow On-Page Checklist
This checklist focuses purely on on-page factors, those being the actual content on your web page and a few pieces of meta data like your page title and meta description.
Set Your Title and Meta Description
Your title and meta description are extremely important pieces of information that Google will use, and place great priority on when indexing your website. They give Google’s bots, a first look into what your page is about and what search terms they should index and rank you for. Without setting these to be relevant to your target keyword, you are going to have a very hard time ranking. Once you have decided on your primary target keyword for your page, you can set your title and meta description by following the steps below.
On Static Pages
To change your title and meta tag on static pages, simply navigate to the relevant page in your page list, open settings and scroll down to “SEO Settings”. Once there, change the content accordingly as per the graphic above. Webflow does an awesome job of providing a preview as to how this will affect your page preview in Google search results which is a really nice touch.
On CMS Pages
Webflow makes it easy to set title and meta tags on CMS pages dynamically. Simply navigate to your relevant CMS template, open up settings and scroll down to “SEO Settings” as you would on a static page. Then to pull data from your CMS collection items dynamically, click on the “add field” links on the top right for “title” and “meta description” respectively and assign them to the value of your choice. Setting the title to the name of the item is generally the best way to go provided it is relevant to the keyword you are targeting (which it should be). In this case I have assigned the meta-tag to the post summary. The best thing to do here would be creating a dedicated “meta-tag” parameter for this collection item and assigning it to the meta tag setting in your template settings.
Keep Your Page Heading(H1) Consistent With Your Title
The Title you setup in step 1 above exists to tell Google and your visitors who find you through Google search what your page is about. If there is discrepancy between your title tag and the heading of your page, both visitors and Google will deem your page to be less relevant than if they were closely related. Because of this, you want to make sure that your page heading aligns with your title tag. This will help Google determine the relevance of your page more effectively and encourage users to engage after entering your site.
Bad Example
The above title tag and page heading combination is poor from an SEO perspective. The title that would appear in Google search results makes mention of specific details, these being Webflow and E-Commerce. The visible heading(H1) on the page is broad and generic creating a disconnect between what both Google and visitors see in search results and the actual content on the page.
Good Example
The above example has solid contextual and keyword consistency between title and on-page content. The new and improved heading makes mention of both Webflow and E-Commerce, making the page appear more relevant to Google for searches containing these terms. This makes it far more likely that this page will be indexed for its intended keywords.
“Chunk” Content Using Headings
Breaking your content up into bite-size, semantically related “chunks” makes your content scannable and provides structure. Each of these chunks should be introduced by a relevant heading (in most cases with the use of an H2 tag). Introducing each of these chunks with an accurate, descriptive heading helps Google’s bots better understand your content. This gives Google a clearer idea as to the keywords it should index and rank your page for. These headings are also very useful to visitors scanning your page as it helps them get to relevant content quickly and with less effort. This increases the amount of time they spend on your site and that, being another Google ranking factor, helps boost your SEO rankings even further.
The example above shows two “chunks” of information, each of them introduced by headings that contain keywords relevant to both Google and website visitors.
Optimize Your Images for Sitespeed
Site speed has always mattered when it comes to user experience. With the introduction of Core Web Vitals as a ranking factor by Google, it now matters for SEO rankings as well. One of the major culprits for slow websites are oversized, uncompressed image files.
If you download an image from a stock photography site, and it is 1920x1080 pixels in resolution, putting that same image into a container that never gets wider than 600 pixels is inefficient from a site speed perspective. Resizing the image to be 600 pixels wide would cut the file size in 3 (more or less) without any compromise on display quality. Now if you repeated this process on every image for a blog post with 6 images let’s say, you would see a massive improvement in site speed.
When it comes to image resizing, always ask yourself the question: “What is the biggest this image would ever need to be given its position and styling on the website?”. Once you have your answer, resize it using a free tool like Adobe Express before uploading to Webflow to keep the file as small as possible while maintaining image quality.
After resizing, you can cut the file size down even further by compressing it. Using a free tool like TinyPNG can further reduce the file size of your images significantly, resulting in even faster load times.
Update the Alt Text of Your Images
Google can crawl and understand text. It cannot understand the visual meaning of images and this is what makes alt text so important for SEO. Setting alt text on your website images explains to Google their relation to your text content and as a result, contributes to how your page is ranked and indexed. Setting alt text is also important for accessibility as it tells people using screen readers, unable to actually see website images what your images are about.
Setting alt text on static images
To set alt text on static images within Webflow, click on the settings cogwheel for the relevant image, click the alt text dropdown and select the “custom description” option. Set the custom alt text to something contextually relevant and you are good to go!
Setting alt text on CMS images (In blog/rich text content)
You can set alt text for images within rich text elements, directly on a given CMS item’s settings. Simply click on the image for which you want to update alt text, click on the spanner highlighted above and create your alt text in the box provided. Once you save your changes on the CMS item your alt text will be applied.
Wrapping Up
While this is not an exhaustive list of absolutely everything you could do to optimize your Webflow on-page SEO, it should help give you a solid understanding of on-page SEO basics and how to apply them on your website. At the end of the day, what Google wants is for you to create high quality content that answers searchers’ questions. Creating good content and applying the steps in this checklist will help you get the SEO ranking rewards you deserve without being an SEO expert.